Digitizing a Paper Pattern to PDF-file, a tutorial

1.
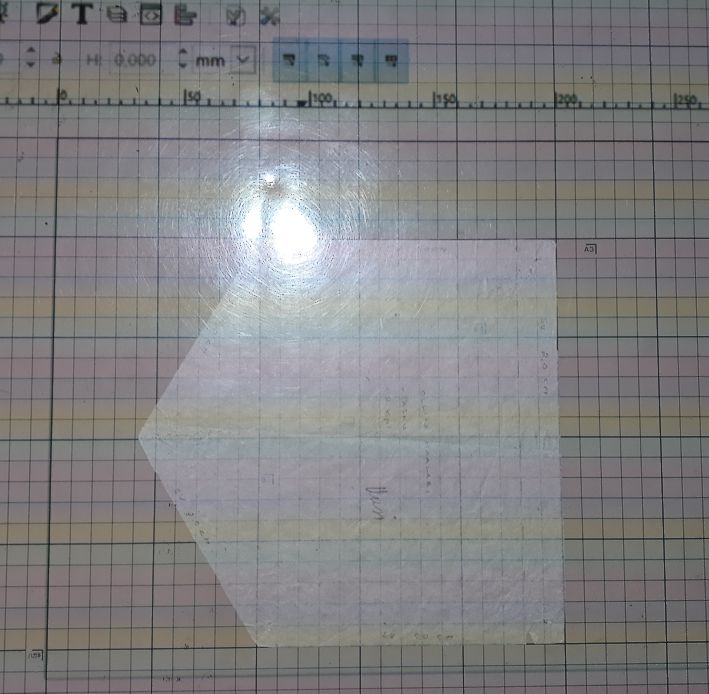
Spread a piece of the paper pattern on your cutting mat. I've used a transparent desk pad to flatten the piece and to keep it in place.
- choose one of the smaller pieces of your pattern to work on first; it will be used to check that the digitized file, using a PDF-reader (e.g. Acrobat or Xodo) will be displayed in the right size

2.
Turn on your projector and computer. In this tutorial I use ceiling setup for the projector and a Windows 10 computer. Casting method is Duplicate Displays.

3.
Open Inkscape. I prefer, with a mouse, to point the icon on the projected image to pointing it on the computer screen. That will be the case in the following pictures, too.
- for this tutorial I've used version 0.92.4

4.
Open "View"-menu.

5.
Choose the work view option "Wide". I recommend this option as it gives a bit more depth to the projected image. In case the pattern piece is just a bit too big to fit in the work window there are still some ways available to make it larger (e.g. you can close some toolbars).

6.
Open "File"-menu.

7.
Choose "Document Properties".

8.
Choose: "Landscape".
- Units: imperial or metric

9.
Add a buffer zone for easier projector cutting.
- 50cm / 20" on each side
- later on, you can change the paper size

10.
Open "Edit"-menu.

11.
Choose "Preferences".

12.
Place your cutting mat and a ruler so that:
- the 0-point of "Zoom correction factor -slider" of Inkscape matches the 0-point of your ruler and one of the vertical lines of the cutting mat
- the slider is parallel with horizontal lines of the cutting mat

13.
Adjust the zoom correction factor -percentage of Inkscape so that the slider matches your mat and/or ruler as closely as possible
- zoom-field is at the right end of the slider
- values can be entered by thousandths but will be rounded to hundredths
- in work view there is a zoom-field too: it shows the zoom percentage rounded to integers

14.
Open on-screen keyboard - Ctrl + Windows + o. I recommend the use of on-screen keyboard because while one is using it the computer needs not be close at hand.
- in Windows since Vista. Activating the feature might require a change in Windows Settings.

15.
Enter a value.

16.
Click Enter to finish the action.

17.
Repeat points 15. & 16. till the ruler and your mat match as close as possible.
- check at the greatest length included in your pattern: is the difference between the Inkscape-ruler and the mat significant enough to cause a problem?
- check also your mat as the printed grid might not be perfectly accurate either

Close the Preferences window.
Activate "Zoom"-tool.
- at the left side of the work view
- "Zoom in or out"

18.
Check that the grain line of your pattern piece is parallel to the horizontal lines of your mat. (In the example, there's no visible grain line as I know that it's parallel with the sides of the pocket - the edges visible at the top and the bottom of the paper pattern piece in the picture.)
Save the work (to Inkscape default file format .svg).

19.
Activate "Bezier"-tool.
- at the left side of the work view
- "Draw Bezier curves and straight lines"

20.
Begin a path by clicking a point close to a corner in the pattern piece.
- in Inkscape the points forming a path are called nodes
- there's no need to try to be precise; the nodes will be put in their exact place later

21.
Click close to the next corner, or point of curve in which it changes from concave to convex or has some other major change in direction.
- a straight line is created
- repeat at every corner, and at each bend of curve
Instead of creating straight lines, Inkscape may interpret a click of yours as an attempt to create a curve, and a pair of handles (picture 26.) appears close to the line segment.
- let them be for the time being

22.
End the path by double clicking close to first node (not on it, though).
Save the work!

23.
Activate "Edit Paths"-tool.
- at the left side of the work view
- "Edit paths by nodes"

24.
Choose the path by clicking on a line.
- the path flashes red as you first hover above one of lines
Close the path.
- drag the last node towards the first one
- "cusp node to cusp node" appears, and the last node is drawn on top of the first

- join the first and last node: select both by diagonally dragging over the nodes, then click on the "Join selected nodes" -tool on property bar

25.
You'll use the arrow keys to move nodes. Note, that there are arrow keys also in the on-screen keyboard.

26.
Move nodes to the precise places according to the original.
- select a node by clicking it
- click/press repeatedly on arrow keys to move the node
- repeat at every node
If there are line segments with handles (picture 28.) you'll need to remove them, unless the section is supposed to be a curve. Click on a line; then on the property bar, click the tool "Make selected segments lines".

27.
To form the curves of the original - click on a line standing for a curve and drag the line in place according to the paper pattern - as close as possible.

28.
Fine-tune the curve by moving the handles.
In case it is impossible to get the Bezier-curve to match the curve of the original pattern piece, most likely, you'll need to add one or more nodes to control the curve. Click on the curve; then click "Insert new nodes to selected segments" - tool on property bar.

29.
The path forming the outer edge of the pattern piece is ready for finishing.
Save the work!

30.
Activate "Select"-tool.
- at the left side of the work view
- "Select and transform objects"

31.
Right-click on the path.

32.
Choose "Fill and Stroke".

33.
Fill-tab:
- choose X (No paint)

34.
Stroke paint - tab:
- choose the light blue square (Flat color)
- red 0
- green 0
- blue 0
- black 255

35.
Stroke style - tab:
- Width: 1,000 mm (1/16 in)
- Dashes: continuous (or dashed line e.g. fold, center)
- Markers: – (arrow-heads if grain line)

36.
Save the work!
Lines typical for patterns
- after creating the path for the outer edge of the pattern everything is ready for you to create inner lines: grain line and fold lines are the most common ones
- use the same tools as for creating the closed object (Bezier and Edit Paths). For a line create the first point and the last point; double-click to create the latter.
Save the work again!

37.
Activate "Text"-tool.
- at the left side of the work view
- "Create and edit text objects"

38.
Use capital letters (easier to see).

39.
Create all the texts you'll need for the pattern piece at the same time.
- after writing one text block click in some other place and write the next one
- there's no need to write in the right place. Text blocks will be moved later
- text blocks can be copied and pasted (e.g. Select-tool, Ctrl+C, Ctrl+V)

40.
Select a text block (Select-tool).

41.
Open Object-menu.
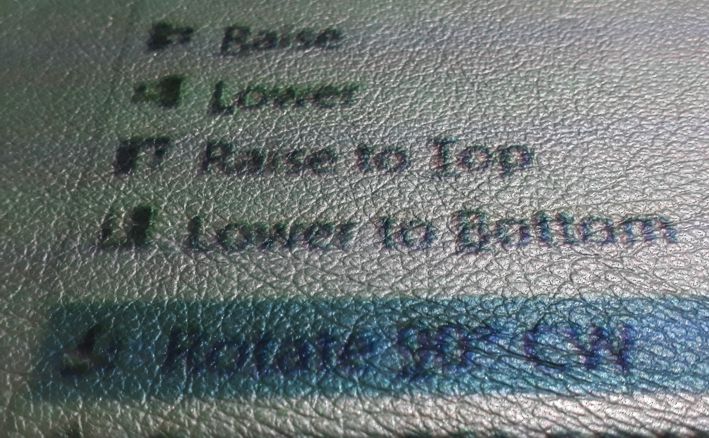
42.
Choose "Rotate 90° CW" or "Rotate 90° CCW".
- when Select-tool is active these tools can also be accessed from the property bar

43.
Carefully click on the text block you rotated.
- if any of the arrows around the block turns green click it again (green arrows let you change the size of blocks)
- to drag the block where you need it you'll need a cross arrow to appear

44.
To rotate a text block freely you need the curved arrows showing in the picture
- the arrows appear by second clicking on the letters of the block
- click on the curved arrow and drag to turn the text block.

45.
Almost done.
Save the work!

46.
Select all the objects of the pattern piece (outer line, inner lines and text blocks).
- Select-tool, click outside of the pattern area (red dot in the upper left corner of the picture) and drag diagonally across the pattern (the dashed line). Let the mouse key up at red arrow

47.
Open Object-menu.

48.
Choose "Group".

49.
Move the pattern piece to find out if all the objects have been grouped into one entity.
- click on any black element on the pattern and drag
- in case some line or text has been excluded from the group undo the move of the grouped object (e.g. Edit -> Undo) and repeat points 46-49
Save the work!

50.
Select the pattern piece, open Object-menu, and choose "Align and Distribute".

51.
To place the pattern piece at the middle of the paper choose Relative to: Page.

52.
Choose "Center on horizontal axis". Check that the pattern piece has enough space around it:
- 50cm / 20" all around if there’s just one piece
- in case there are more than one piece the buffer 50cm / 20" should go all around them
- if there isn't enough space, choose a bigger paper size (File-menu -> Document Properties)

53.
Save the work Save the work also to PDF-format.

54.
Open a PDF-reader - e.g. Adobe Reader or Xodo Reader (in this tutorial I use Acrobat Reader).
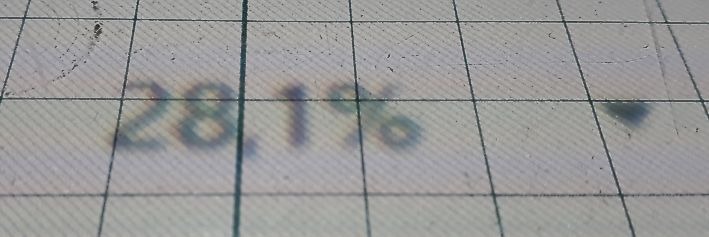
55.
Enter your calibrated zoom-percentage.

56.
Open the PDF-file, and check the size of the projected image with the original paper pattern piece.

57.
More than likely, some pattern pieces are too big to fit on the display area.

58.
Before starting to digitize, draw lines that divide the pattern piece in parts that fit the available area.

59.
Digitize the first part. Move the last node on top of the first one, but don't join them. Move the original pattern piece. Match the dividing line and the extension of the grain line. Move the last node of the first part away from the first node.

60.
Begin the path for the second part close to the first node of the first, and end it close to the second-to-last.

61.
Remove the unnecessary line.
- click the last node of the first part

- click "Delete selected nodes" -tool on property bar

62.
Join the parts by joining the first nodes and the last nodes (picture 24).


63.
Oh, yeah... some patterns are more bothersome than others.

64.
All the pieces of the pattern - PDF-file
Sinikka Laine 2020-08-12
Kommentit
Lähetä kommentti